
Orthotics
Donning Instructions for a Two-Piece Body Jacket
- Apply a cotton T-shirt or cotton stockinet.
- Roll the patient to his/her side.
- Push the back section of the brace into place, lining up the waist grooves of the brace with the patient’s waist. The waist is between the lowest rib and the top of the pelvis.
- Roll the patient to his/her back and position the brace so it is centered on the patient’s back.
- Put the front half of the brace on, making sure the front overlaps on the outside of the back.
- Put the Velcro from the front through the loops on the back and evenly tighten all straps as tight as can be tolerated.
- The bottom two straps should be as tight as possible, while the top straps can be slightly looser to permit breathing.
- Wipe the inside of the brace with rubbing alcohol to keep it clean and sterile.
AFO / KAFO / Arch Supports / KO / SMO / UCBL / Other Lower Extremity Orthoses
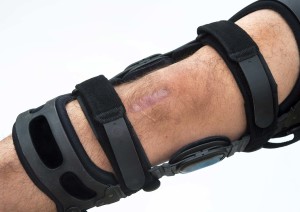
Knee brace for ACL football knee injury.
- It is important to break in your new orthosis slowly. Start wearing your orthosis a couple of hours at a time several times a day. Add additional hours every other day until you are wearing it all day.
- After removing your orthosis, check your skin for redness. Some redness is common and should disappear in 20-30 minutes. If it hasn’t, discontinue wearing your orthosis and contact your orthotist for an adjustment.
- Always wear a clean sock or nylon that extends higher than the top of your orthosis. This will help protect your skin and absorb perspiration. Make sure there are no wrinkles in your sock before you put on your orthosis.
- A shoe should be worn over the orthosis at all times since the bottom surface is quite slippery. Make sure the shoe fits properly and doesn’t pinch your toes.
- Clean your orthosis weekly by wiping it with rubbing alcohol or soap and water. Overnight drying works well.
- Keep the straps tight to prevent the orthosis from shifting, moving and chafing.
- When the straps lose their grip, call our office to have them replaced.
- If redness persists, or you feel pain, make sure your shoelaces are snug and the shoe is appropriate. Call for any adjustments. NOTE: Do not let blisters develop! Adjustments, advice and answering questions are free of charge.
- If you are given a knee orthosis, follow the instructions given during the fitting process and in the handout from the knee brace company. If you have any questions, please contact your orthotist.
LSO / TLSO / Chairback / Jewett / Corset / Other

Lumbar jewet braces, hyperextension brace for back trauma or fracture thoracic and lumbar spine
- Don’t expect to be able to move in all directions or sit in all types of chairs. The orthosis is designed to limit motion and positions.
- Always wear a clean T-shirt underneath your orthosis to protect your skin and absorb perspiration. All other clothing should be worn over the orthosis.
- Make sure the waist groove of the orthosis is aligned between your hips and ribs.
- Keep the straps tight to prevent the orthosis from shifting, moving and chafing.
- The orthosis needs to be cleaned with rubbing alcohol or mild soap and water.
- It is normal to see some redness. Redness lasting longer than 20-30 minutes may require adjustments, so call our office as soon as possible for an appointment.
- The amount of time you will wear the orthosis will be determined by your physician and it usually relates to your diagnosis.
- If you have any questions or problems, please do not hesitate to call your orthotist.
Scoliosis TLSO Wearing Schedule
| Day of Fitting | ||||
|---|---|---|---|---|
| Brace Put On | Take Brace Off | Min Time Off | Time On | Total Hours |
| 45 min | 2 hrs | 4-6 hrs | ||
| Stage I: After School | ||||||
|---|---|---|---|---|---|---|
| Day | Time On | Min Time Off | Time On | Min Time Off | Time On | Total Hours |
| Day 2 | 2 hrs | 45 min | 2 hrs | 45 min | 2 hrs | 4-6 hrs |
| Day 3 | 3 hrs | 45 min | 3 hrs on | 5-6 hrs | ||
| Day 4 | 4 hrs | 45 min | 2 hrs on | 5-6 hrs | ||
| Day 5 | 5-6 hrs on | 5-6 hrs | ||||
| Stage II: Bedtime | ||
| Day | Bedtime wear | Total hours |
| Day 6-7 | 8-10 hrs | 8-10 hrs |
When bedtime use is started, take the brace off if it wakes you up. Try again the next night. Eventually sleeping through the night will happen.
| Stage III: Bedtime and After School | ||||||
| Day | Time On | Min Time Off | Time On | Min Time Off | Time On | Total Hours |
|---|---|---|---|---|---|---|
| Day 8 | 8 hrs | 45 min | 2 hrs | 45 min | 2 hrs | 10-12 hrs |
| Day 9 | 8 hrs | 45 min | 3 hrs | 45 min | 3 hrs | 12-14 hrs |
| Day 10 | 8 hrs | 45 min | 4-6 hrs | 12-14 hrs | ||
| Stage IV: bedtime and after School | ||||
| Day | Time on | Min Time Off | Bedtime Wear | Total Hours |
|---|---|---|---|---|
| Day 11 | 8 hrs | 45 min | 6-8 hrs | 14-16 hrs |
| Stage VI: Full Time | ||||||
| Day | Time On | Min Time Off | Time On | Min Time Off | Time On | Total Hours |
|---|---|---|---|---|---|---|
| Day 12 | 8 hrs | 45 min | 8 hrs | 45 min | 2 hrs | 18 hrs |
| Day 13 | 8 hrs | 45 min | 8 hrs | 45 min | 4 hrs | 20 hrs |
| Day 14 | Full Time: 20-22 hrs/day | |||||
Plastic Ankle Foot Orthosis (AFO)
If you have just received your new ankle foot orthosis; it has been designed and fabricated just for you. To achieve the best outcome, please follow these instructions carefully.
Applying the AFO
- Select the proper sock. Your sock must extend, wrinkle-free, the full length of the orthosis.
- Select the proper shoe. You may need to purchase a shoe ½ size larger.
- Bend your knee and place your heel all the way into the orthosis.
- Fasten the ankle strap.
- Fasten the calf strap.
Wearing Information
- Gradually increase your wearing time during the first few days. The average break-in period for full time wear is 7-10 days.
- Check your skin frequently, especially if you have reduced sensation. After removing your AFO, any redness should disappear in 20-30 minutes. Should any pressure spots, rash or other skin irritation last for longer than 30 minutes after removal of the orthosis, discontinue use and contact your orthotist immediately.
Care of the AFO (if applicable to your brace)
- To clean your AFO, wipe it out frequently with rubbing alcohol. DO NOT IMMERSE METAL PARTS IN WATER.
- Periodically check all screws and tighten as needed.
- Lubrication of all metal joints should be done by your orthotist.
- The Velcro straps should be replaced if they are torn or if they no longer hold well. Please see your orthotist for proper replacement.
If you have any questions or concerns, please call your orthotist.
Plastic Foot Orthosis (FO)
Your new foot orthosis has been designed and fabricated just for you to support the arch of your foot and hold your heel and forefoot in a neutral position. To achieve the best outcome, please follow these instructions carefully.
Applying the Foot Orthosis
- Select a close fitting and wrinkle-free cotton sock.
- Select a high quality, lace-up shoe. We recommend walking shoes.
- Place the orthosis in your shoe first and then slide your foot in.
- Check for wrinkles in your sock and then lace your shoe to the top.
Wearing Information
- Gradually increase your wearing time during the first few days. The average break-in period for full time wear is 7-10 days.
- Check your skin frequently, especially if you have reduced sensation. Some redness is common and should disappear in 20-30 minutes. Should any pressure spots, rash or other skin irritation last for longer than 30 minutes after removal of the orthosis, discontinue use and contact your orthotist immediately.
- Monitor your discomfort. It is common to have some initial discomfort; however, this discomfort should decrease after the break-in period. If there is increased discomfort, discontinue use and contact your orthotist immediately.
Care of the Foot Orthosis
Clean your orthosis regularly by wiping it out with rubbing alcohol. If you have any questions or concerns, please call your orthotist.
Soft Foot Orthosis (FO)
Your new foot orthosis has been designed and fabricated just for you to support the longitudinal and transverse arches of your foot and distribute the weight bearing forces evenly on the bottom of your foot. To achieve the best outcome, please follow these instructions carefully.
Applying the Foot Orthosis
- Select a close fitting and wrinkle-free cotton sock.
- Select a high quality, lace-up shoe with a removable insert.
- Place the orthosis carefully in your shoe and then slide your foot in.
- Check for wrinkles in your sock and then lace your shoe to the top.
Wearing Information
- Gradually increase your wearing time during the first few days. The average break-in period for full time wear is 7-10 days.
- Check your skin frequently, especially if you have reduced sensation. Some redness is common and should disappear in 20-30 minutes. Should any pressure spots, rash or other skin irritation last for longer than 30 minutes after removal of the orthosis, discontinue use and contact your orthotist immediately.
- Monitor your discomfort. It is common to have some initial discomfort; however, this discomfort should decrease after the break-in period. If there is increased discomfort, discontinue use and contact your orthotist immediately.
Care of the Foot Orthosis
Clean your orthosis regularly. Wipe all surfaces with a mild soap and rinse thoroughly. Dry completely before reapplying. Do not use hot water or heat to dry. If you have any questions or concerns, please call your orthotist.